Saturday, June 30, 2012

Unsubscribing to Feeds in Google Reader

I liked GFC...Google abandoned it.
I liked Google Reader...Google abandoned it.

For months now, I've felt like a Google refugee, off on a journey to find new products to replace those I liked so much. Google's answer is, "But now there's Google Plus! An even better product!" But the last thing I'm interested in doing is replacing yet another product that I like (Facebook) with Google's facsimile. At least I'm not bitter or anything ;)

Since the big switch to Google Plus, Google Reader hasn't allow users to permanently delete subscriptions. You could do it alright, but they'd be right back on your subscriptions list within a day or so. This was a big deal to me because when I began building my list of feeds, I was an avid coupon user. Having stopped couponing several months ago, it's now annoying to be alerted multiple times that there's a newly-released 50 cents coupon off Ziploc baggies.

In looking for alternatives to Google Reader, I found FeedDemon and am really happy with it the results! It's enabled me to copy all of my subscriptions from Google Reader and then unsubscribe from the ones that no longer interest me.
Here's how I kept my Google Reader subscriptions without Google Reader "resubscribing" to my "unsubscribes"...
  1. Download FeedDemon.
  2. Synchronize the account with your Google Reader account (Tools > Enable Synchronization, etc.).
  3. After it stops synchronizing, simply stop synchronizing (Tools > Options > Synchronization Options > Account > Remove Now > Yes > Okay).
  4. Now right click on the blogs you no longer want to follow and select "Unsubscribe." They'll STAY gone in FeedDemon :) 
  5. Enjoy using FeedDemon instead of Google Reader. I have!

  6.  
Disclaimers:
  • I've no affiliation with any of the products mentioned in this post. This is simply an attempt to help anyone else in my shoes.
  • I'd never purposefully lead you to use something that would harm your computer, but I'm no expert. Use the information in this post at your own risk.

Tuesday, June 26, 2012

IMO: Favorite Mother-Daughter Workbook

Christian Charm Course: Student's Book


Often while photographing my daughter, she'll say, "Hold on! I'm trying to do what I learned in Christian Charm School!" Then she'll adjust her posture, body and smile in such a way that it causes her to glow. I can't really explain why, but there's a marked difference in befores and afters.

Anyway, as she said, this lesson came from the Christian Charm Course by Emily Hunter. We found our copy of the book and workbook at a yard sale, so we have the one pictured above (1985). However, there is a 2009 updated one available.


We've only begun the book, but we both really like it!

Monday, June 25, 2012

My 1st Portrait Shot with Blurred Background!


Dabs in my 1st "blurry background" picture!

(Maybe I'm the only one who's photographically-challenged, but just in case there's anyone else out there like me...) Thanks to this webpage on DSLRtips.com, I was able to do something I've always wanted to learn how to do: blur the background in my photographs!

Saturday, June 23, 2012

My Victoria Falls VBS Room


VBS Victoria Falls Decorations

Through Divine guidance and provision, I finished decorating my VBS room! Here's the breakdown...
  • Swim noodle rainbow with polyfil clouds
  • styrofoam glider hanging beside the rainbow 
  • rock walls from crumpled craft paper
  • rocks made from crumpled craft paper wrapped around polyfil
  • waterfalls made from blue plastic tablecloths and fringe curtains my daughter and I made by attaching 9 ft strips of metallic blue ribbon to duct tape 
  • white foam at the base of the waterfall was the drapery from my daughter's princess canopy over her bed
  • frame (This was something that was donated to my library at school from a local church. It's two PVC poles in a bucket of concrete, with an additional PVC pole attached perpendicular along the top.)
I also bought spray paint to make the rocks more authentic, but I just didn't think it was necessary. Might I share a few shopping tips...
  • If you can stand to, you can buy iridescent fringe curtains for about $9 for a 3 feet section from Party City.
  • Dollar Tree is a great source for tablecloths, swim noodles, and craft paper.
  • Dollar General is a great source for swim noodles and the styrofoam glider.
  • Hobby Lobby sold the box of Polyfil, and I was able to use a 40% off coupon.
  • Michael's sold blue duct tape, and I was able to use a 40% off coupon.

I'd love to see what you've done. Please let me know how I can view it. You can also visit my Pinterest page on this topic.

Thursday, June 21, 2012

Summer Weight Loss Goal

Okay, here I am at the end of spring, not having met my goal (again). Please understand that this is a result of a failure to participate, not a failure of any plan. I could think of many reasons for my disengagement over the past few months, but it won't benefit anyone to review them. The fact is, there will always be a reason to wait to take this seriously. What I need is better commitment.

So, having just returned from a family vacation, I imagine this is a great time to start over! The goal for the summer will be the same as my spring goal. The plan I'll be following can be found here.

Wednesday, June 13, 2012

Flock Together in on Vacation until July 2

Flock Together
The hop will be on vacation for a couple of weeks.
Please drop back by on Monday, July 2 at 6:00 PM EST to sign up for the July 3 blog hop. Thanks for your continued support of the blog!

Tuesday, June 12, 2012

No Sew DIY Dog Bed from Old Towels and Old Pillows

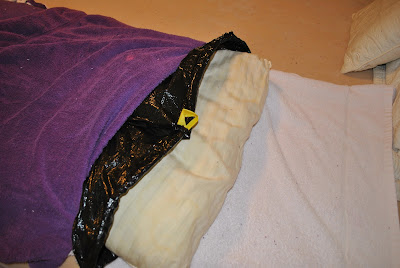
In searching for a DIY dog beg, I found some neat tutorials for using fleece. Having none, I decided to try the project with old beach towels and old pillows, and this was what I ended up with...

DIY Dog Bed from Old Beach Towels and Pillows

DIY Dog Bed Instructions

1. Gather your materials
  • 2 contrasting used beach towels
  • scissors
  • 2 old standard pillows
  • lawn size plastic bag

2. Lay the towels on top of each other, aligning the sides.


3. Cut 4" x 4" squares from the ends of ONE of the short sides of the towel set.


4. On the same short side, Cut strips through both towels, about 5/8" wide by 4" deep all the way to the end. Don't cut the other short side.


5. Lay both pillows (long side to long side) along the end of the cuts you've just made. This will show you where your stuffing will end. THAT'S where you should stop cutting strips on the long sides. Go ahead and cut strips (as in step 4) on both long sides, leaving a flap that begins where your pillows end.


6. Double tie the top and bottom strips as close to the end of the cut as possible on all three sides.


7. Place a pillow in the lawn bag, and drop the bag/pillow into your towel "case." Then place the other pillow in the bag. Cinch up the bag and tuck it in.


8. Tuck both towel flaps in the open end and smooth them out.


There...washable, waterproof and green (I recycled :). It was also inexpensive - ok, cheap! The only downside was that it's a MESSY project, so build in time to clean up little towel particles everywhere. You may want to do this outside or in a garage, so you can sweep or vacuum it all up quickly.

Let me know if you need clarification. I'll help as best I can. Now- off to clean up!


Monday, June 11, 2012

VBS: Giant DIY Victoria Falls Rainbow

My DIY Giant Rainbow for VBS. (That's my "Boog." She said she wanted to be "under the rainbow!")


Remember that rainbow I told you I wanted to make out of swim noodles? Well, I did it! I'm hoping that it will enhance my Victoria Falls room. I consider this a prototype, and I'm sure you'll think of better ways to do it, but here are the directions for how I made mine.

1. Gather your materials:
  • 2 of each color swim noodle (6 were from Dollar General, and 2 came from Wal-Mart, each at under $2 each. I did see them at Dollar Tree, though, so you could cut your expense in half!)
  • fishing line ( I used 15 pound from Wal-Mart at under $3)
  • glue gun and sticks (NOT the mini one - tried that first and it failed)
  • wire coat hangers (straightened)
  • scissors (I used the heavy duty ones that came with my kitchen knives)
  • cotton batting (fiberfill, polyfill)
2. Thread the noodles with the straightened coat hangers. You should bend a hook into the end your pushing through so that it doesn't snag. I tried two different methods. First I placed one in each noodle, but since I was unsure how I would link the two together, I changed and began placing half the hanger in one and threading the other noodle on the protruding end. This worked okay, but I think I prefer having a full coat hanger in each so that you can bend the entire noodle.

3. Where the noodles touch, trim one of them to have an angle, so that when you push them together, they have a little arch.

4. Hot glue the two noodles together, end to end. (Yes, you're right. Hot glue DOES melt swim noodles, and I sort of knew that going in, but we've had such a rainy day here that I couldn't imagine how long it would take for craft glue to dry. So I went forward with the plan!) I will say that the Dollar General noodles were much more tolerant of the hot glue, while the Wal-Mart ones melted like wet cotton candy. No matter, I did pick up a few tricks to help...
  • Don't let the tip of the glue gun touch the foam.
  • If you have a colossal fail, trim the yucky parts off, get a clean edge, and start over.
  • You may need to trim the end of the noodle into a doughnut shape in anticipation of the foam melting flat.
  • Drop the glue from a couple of inches above so it can cool a little.
  • Hold the pieces tightly together for at least a minute. Then lay them gently down and hope for the best. You'll be surprised at how it will eventually work.
5. Once your glue has cooled and held tight, hold the seam in one hand and bend one side into an arch. Do likewise with the other side.

6. Repeat steps 3-5 for each color you have.

7. Align the seams of all noodle sets in a rainbow design and use the fishing line to weave over and under each noodle about 6 inches to the left of the seams. Knot then ends and apply a dot of hot glue. You'll need to pull the line tightly while the glue dries so it doesn't slip out. Repeat this about 6 inches on the other side of the seams and then about every foot on both sides.

8. Push the foam in and thread a little fishing line under one of your fishing lines. Knot it and glue it to create a hanger. You can do this wherever you like.

9. For the clouds, I just widened a hanger and shoved batting here and there until it was covered and cloud-like. Then I pushed the hanger hook through one of the noodles and rearranged batting to cover it.

In all, I have about $18 invested and am happy with the results! It wasn't exactly easy, but I think it will make a great addition to my Victoria Falls room.

Please let me know if you have any questions. I'll happily help as best I can. You can visit this post to see more VBS Victoria Falls ideas. Also, I'd love to hear of your ideas for making an indoor rainbow.


UPDATE: I finished my room! Click here to see the blog post and picture.

Flock Together Blog Hop 6/12

Welcome! To participate, simply...

Flock Together1. Link up: Click on "Click here to enter" at the bottom of this post and follow the Linky Tools directions. In step 4, I recommend selecting "Auto Crop" and "From Web."

2. Find new friends: Click through the blogs and follow the ones you love (Linky Followers, Google+, RSS, GFC, Twitter, Facebook, e-mail, etc.). Kindly pass by the ones you don't.

I try my best to follow EVERYONE who joins the hop, but it helps if you leave a comment letting me know you're new here. Also, please sign up for Linky Followers! It's a great alternative to Google Friend Connect.
    This week's Fine feathered Friend is Nicole at


    I'm a midwestern girl, transplanted on the east coast, by my marriage to the Air Force. I am a new mothership of one hilarious little girl, a music + fashion zealot, animal <3r, photo taker and baby gear addict, with a deep love for all things indie + modern.

    What a cute blog by such a cute lady! This blog has treats for women and moms such as posts about make-up, celebrating holidays, and many baby care and product ones. I found her transparency so nice (read the less than "100 Things About Me" that she's working on. I hope you'll click over to her blog and consider joining her this week.
    Want to be featured as next week's Fine Feathered Friend? Click here to find out how. It's free and easy.


    Need a little help?
    • If this is all new to you, click here.
    • If your goal is to find friends and gain followers, may I recommend that you set a goal to find and follow a minimum number of blogs that interest you. Check back throughout the day to visit late entries that might be just your cup of tea! Leave a comment if you follow, and consider following back those who follow you.
    • If you see empty boxes with red x's instead of pictures in the linky, try clearing your cache (Go to Tools > Internet Options > Under the General tab and Browsing History section, click "Delete"> check Temporary Internet Files > Delete > then refresh or reload Mom's Best Nest).

    Thursday, June 7, 2012

    LAST CHANCE! Giveway ends tonight - less than 600 entries!


    Today is the last day of my Aardvark Strainer Giveaway, with less than 600 entries to date! As always, there's an EASY ENTRY option, as well as multiple entry options, so enter now for your chance to get one of these cool strainers for yourself AND one for a friend.

    Monday, June 4, 2012

    Flock Together Blog Hop 6/5

    Welcome! To participate, simply...

    Flock Together1. Link up: Click on "Click here to enter" at the bottom of this post and follow the Linky Tools directions. In step 4, I recommend selecting "Auto Crop" and "From Web."

    2. Find new friends: Click through the blogs and follow the ones you love (Linky Followers, Google+, RSS, GFC, Twitter, Facebook, e-mail, etc.). Kindly pass by the ones you don't.

    I try my best to follow EVERYONE who joins the hop, but it helps if you leave a comment letting me know you're new here. Also, please sign up for Linky Followers! It's a great alternative to Google Friend Connect.
      This week's Fine feathered Friend is Di at

      I am a shopping enthusiast and stay at home Mom to a cute little Cupcake and adorable little Peanut! I enjoy finding good deals and sharing them, especially when it's related to handbags, clothing, shoes, makeup, or baby gear! I'm a fan of authentic designer handbags and love to chat about them! I started this blog to share my daily musings on babies, bags, and life! From makeup & beauty, to clothing trends, my latest purchases, or products I really love. (Or... didn't love!) Nothing is off limits.

      From handbags to nail polish to jewelry and more, Di's blog features beautiful fashion finds you're sure to oooo and ahhh over. Her beauty product reviews are helpful in finding great new products, as well as warning against others! She also hosts beauty and scent related giveaways. Be sure to check out this girly blog and consider following her!

      Want to be featured as next week's Fine Feathered Friend? Click here to find out how. It's free and easy.


      Enter my Aardvark Strainer giveaway (click here)!


      Need a little help?
      • If this is all new to you, click here.
      • If your goal is to find friends and gain followers, may I recommend that you set a goal to find and follow a minimum number of blogs that interest you. Check back throughout the day to visit late entries that might be just your cup of tea! Leave a comment if you follow, and consider following back those who follow you.
      • If you see empty boxes with red x's instead of pictures in the linky, try clearing your cache (Go to Tools > Internet Options > Under the General tab and Browsing History section, click "Delete"> check Temporary Internet Files > Delete > then refresh or reload Mom's Best Nest).

      Saturday, June 2, 2012

      Children's Sermon: "Walking the Plank to the Baptism Tank"

      This week I'll share Walking the Plank to the Baptism Plank by Mike Thaler. It's from his hilarious Tales from the Back Pew series. Even though these books are LOL funny, it's nigh impossible to miss his intended application to God's Word! I highly recommend getting the entire set.

      You can click on the following links to find this book for less than $5: Christian Book DistributorsAmazon, Barnes & Noble, and Books a Million. By the way, I have no affiliate links to any of these sources and am only providing these links for your convenience.